Dive into the vibrant world of Korean “hwe” (raw fish) with these 7 must-try recipes! From the classic hoe-deopbap (raw fish rice bowl) to the spicy and tangy hwe-muchim (raw fish salad), explore the diverse and delicious flavors of Korean raw fish dishes. Whether you’re a seasoned hwe enthusiast or a curious newcomer, these Korean raw fish recipes offer a fantastic culinary adventure. Get ready to tantalize your taste buds with the freshest and most flavorful hwe experiences Korea has to offer.
Slow-Cooked Beef Nihari
This recipe guides you through making a rich and flavorful Beef Nihari, a slow-cooked South Asian stew. It emphasizes the careful blending of spices and the gentle simmering required to achieve tender, melt-in-your-mouth beef.
Ingredients
Beef: 1 kg beef with bone
Salt: 1.5 tsp
Red Chili Powder: 2 tbsp
Kashmiri Chili Powder: 2 tbsp
Turmeric Powder: 1/2 tsp
Dry Ginger Powder: 2 tbsp
Long Pepper: 4
Star Anise: 2
Carom Seeds: 1/2 tsp
Nutmeg: 1/4 tsp
Mace: 1/4 tsp
Black Pepper: 1/2 tsp
Black Cumin: 1/2 tsp
White Cumin: 1/2 tsp
Green Cardamom: 2 large pods
Black Cardamom: 5 pods
Cloves: 6
Cinnamon Sticks: 2
Bay Leaves: 4
Oil: 2.5 cups
Ginger-Garlic Paste: 3 tbsp
All-Purpose Flour: 1/2 cup
Water: As needed
Instructions
Step 1: Sautéing Aromatics: Heat oil in a large pot. Add ginger-garlic paste and sauté until fragrant.
Step 2: Blending Spices: Add salt, red chili powder, Kashmiri chili powder, turmeric powder, dry ginger powder, long pepper, star anise, carom seeds, nutmeg, mace, black pepper, black cumin, white cumin, green cardamom, black cardamom, cloves, cinnamon sticks, and bay leaves. Mix well and sauté until fragrant.
Step 3: Braising the Beef: Add the beef to the spice mixture and stir well. Add water, bring to a boil, then reduce heat and simmer until the beef is tender.
Step 4: Separating the Oil: Once the beef is cooked, increase the heat to allow the oil to separate from the stew. Skim off the excess oil and set aside.
Step 5: Thickening the Gravy: Dissolve the all-purpose flour in 2 cups of water. Add this mixture to the Nihari and cook until the gravy thickens to your desired consistency.
Step 6: Final Touches & Serving: Add the reserved oil back into the Nihari. Garnish with fresh coriander, ginger juliennes, and lime wedges. Serve hot with naan bread.
Easy Stovetop Chicken Tikka Pizza (No Oven, No Egg)
This recipe provides a simple method for making delicious chicken tikka pizza without an oven or eggs. It’s perfect for a quick weeknight meal or a fun weekend project.
Ingredients
- 2 cups all-purpose flour (maida)
- 1 tsp yeast
- Salt to taste
- 1 tsp sugar
- 3 tbsp oil
- 1 cup lukewarm water
- 1 cup homemade or leftover chicken tikka
- 3 tbsp pizza sauce or tomato ketchup
- 1 diced tomato
- 1 diced bell pepper (capsicum)
- Mozzarella and cheddar cheese as needed
Instructions
-
In a bowl, combine the flour, sugar, oil, yeast, and salt. Gradually add the lukewarm water and knead into a smooth dough. Place the dough in an airtight container and let it rise in a warm place for 2 hours.
-
Grease a pizza pan. Once the dough has risen, spread it evenly in the pan.
-
Spread pizza sauce or tomato ketchup over the dough. Sprinkle with mozzarella and cheddar cheese. Arrange the chicken tikka pieces on top, followed by the diced tomatoes and bell peppers. Add another layer of cheese.
-
Preheat a large pot or pan over medium-low heat. Place the pizza pan inside the pot and cover it. Cook for 10-15 minutes.
-
Check the pizza with a skewer or toothpick. When the dough is cooked through and the cheese is melted and bubbly, your delicious stovetop chicken tikka pizza is ready!
Delicious Besan Barfi (Monthal)
This recipe guides you through making delicious Besan Barfi, also known as Monthal. This sweet treat is made with gram flour (besan) and a rich sugar syrup, creating a melt-in-your-mouth texture. Follow these easy steps to create this delightful dessert.
Ingredients
- 1 kg Besan (Gram Flour)
- 500g Asli Ghee (Clarified Butter)
- 1 kg Chini (Sugar)
- 1 cup Badam (Almonds), chopped
- 1 cup Piste (Pistachios), finely chopped
- ½ teaspoon Zarde ka Rang (Yellow Food Coloring – optional)
Instructions
-
Prepare the Besan: Sift 1 kg of besan into a large bowl. Gradually add 125g of ghee to the besan, rubbing it in with your hands until it resembles coarse crumbs.
-
Remove Lumps: Rub the besan mixture thoroughly with your hands to ensure there are no lumps remaining. Sift the mixture again to ensure a smooth texture.
-
Make the Sugar Syrup: In a saucepan, combine 1 kg of sugar with 500g of water. Heat over medium heat, stirring until the sugar dissolves completely. Continue to cook until the syrup reaches a one-thread consistency. Important: The one-thread consistency is crucial for the barfi to set properly.
-
Roast the Besan: In a wide, heavy-bottomed pan, heat the remaining 375g of ghee. Once hot, add the besan and roast over medium heat, stirring continuously. Continue roasting until the besan changes color slightly, starts to release its aroma, and the ghee separates from the mixture. This indicates the besan is cooked.
-
Combine and Set: Reduce the heat to low. Add the prepared sugar syrup to the roasted besan while stirring continuously. Keep stirring until the mixture thickens and starts to leave the sides of the pan. Add most of the chopped almonds and pistachios, reserving some for garnishing. Grease a large tray or plate with ghee. Spread the besan mixture evenly onto the greased tray. Score the surface with a knife to create desired shapes. Garnish with the remaining nuts. Allow the barfi to cool and set completely for about 1 hour. Once set, cut into pieces and enjoy!
Smoked Eggplant Mash (Baigan ka Burta)
This recipe guides you through making delicious Baigan ka Burta, a flavorful South Asian mashed eggplant dish. With a blend of roasted eggplant, potatoes, and spices, this comforting dish is perfect served with rice or roti.
Ingredients
- Eggplant: 3 small
- Potatoes: 2 small
- Onion: 1, sliced
- Tomatoes: 2, sliced
- Red Chili Powder: 1 tbsp
- Green Chili Paste: 1 tsp
- Turmeric Powder: 1/2 tsp
- Cumin Seeds: 1 tsp
- Curry Leaves: 3-4
- Garlic: 2-3 cloves, minced
- Tamarind Water: 2 tbsp
- Green Chilies, chopped: 2
- Coriander Powder: 1 tsp
- Garam Masala: 1/2 tsp
- Ginger, finely chopped: 1 tsp
- Oil: 3 tbsp
- Salt: to taste
Instructions
-
Prepare the vegetables: Slice the onions, tomatoes, and chop the potatoes and eggplant into small pieces.
-
Sauté aromatics: Heat oil in a pan. Add curry leaves, chopped green chilies, minced garlic, and cumin seeds. Sauté until fragrant.
-
Sauté onions: Add sliced onions and sauté until they soften and change color.
-
Add green chili paste: Add green chili paste to the pan and sauté for a minute.
-
Add tomatoes and spices: Add sliced tomatoes and salt. Sauté until the tomatoes soften. Then, add red chili powder, turmeric powder, coriander powder, and garam masala. Mix well.
-
Add eggplant, potatoes, and ginger: Add the chopped eggplant, potatoes, and ginger to the pan. Stir to combine with the spice mixture.
-
Cook the vegetables: Cover the pan and let the vegetables cook until softened. Add a little water if needed to prevent sticking.
-
Add tamarind water: Once the vegetables are cooked, add tamarind water and stir well.
-
Final touch: Add chopped green chilies and simmer for a few minutes. Remove from heat.
-
Serve: Mash the eggplant mixture lightly with a fork or potato masher if desired. Serve hot with rice or roti.
Dahi Bhalay (Lentil Fritters in Yogurt)
This recipe guides you through making delicious Dahi Bhalay, a popular South Asian street food. Dahi Bhalay are lentil fritters soaked in yogurt and topped with flavorful chutneys and spices. It’s a refreshing and satisfying dish, perfect for a snack or light meal.
Ingredients
- Lentil Fritters:
- 500g Besan (Gram Flour)
- 200g Urad Dal (Split Black Lentils, optional – this makes the fritters softer)
- 3 Large Onions
- 8 Green Chilies
- 1 tsp Salt
- 1 pinch Baking Powder
- Yogurt Mixture:
- 500g Yogurt
- 2 Large Boiled Potatoes
- 3 Tomatoes
- 1 tsp Chaat Masala
- 1 tsp Salt
Instructions
-
Prepare the Lentil Fritters: In a bowl, combine the besan (and urad dal if using), baking powder, and salt. Mix well. Gradually add water to form a thick batter. Finely chop the onions and green chilies and add them to the batter. Heat oil in a deep pan. Drop spoonfuls of the batter into the hot oil and fry until golden brown. Once fried, transfer the fritters to a bowl of cold water to soak and soften. This is a key step to achieving the desired soft texture.
-
Assemble the Dahi Bhalay: Whisk the yogurt until smooth. Chop the boiled potatoes, tomatoes, green chilies, and onions. Drain the fritters and gently squeeze out excess water. Add the fritters, potatoes, and chopped vegetables to the yogurt. Season with salt and chaat masala. Mix everything gently and serve chilled.
Enjoy your refreshing and flavorful Dahi Bhalay!
Creamy Tikka Masala Pasta Shells
This recipe provides a delicious twist on classic Tikka Masala by incorporating shell pasta. It’s a quick and easy weeknight meal that’s sure to satisfy.
Ingredients
- 1 pound boneless, cubed chicken
- 4 tablespoons Tikka Masala powder (any brand)
- 1/2 cup yogurt
- 1 teaspoon salt
- 4 tablespoons oil
- 1 tablespoon chili sauce
- 1 tablespoon soy sauce
- Juice of 1 lemon
- 4 green chilies, finely chopped
- 2 tablespoons ginger-garlic paste
- 1 tomato, finely chopped
- 1 packet shell pasta
Instructions
- Boil the pasta according to package directions until al dente. Drain and set aside.
- In a bowl, marinate the chicken with ginger-garlic paste, salt, yogurt, Tikka Masala powder, and lemon juice. Allow to marinate for at least 15 minutes (longer is better).
- Heat the oil in a pan. Add the marinated chicken and cook until browned.
- Once the chicken is browned, add the soy sauce and chili sauce. Mix well.
- Add the chopped tomatoes and green chilies. Stir to combine.
- Add the cooked pasta to the pan and mix thoroughly, coating the pasta with the sauce.
- Serve hot and enjoy!
Dahi Phulkiya Chana Chaat
This recipe guides you through making a delicious and refreshing Dahi Phulkiya Chana Chaat. This popular street food combines crispy phulkiyas (fried dough puffs), boiled chickpeas and potatoes, tangy chutneys, and creamy yogurt. Follow the steps below to create this flavorful chaat at home.
Ingredients
For the Phulkiyas:
- ½ cup Besan (gram flour)
- ½ cup All-Purpose Flour (Maida)
- ½ tsp Baking Soda
- ½ tsp Salt
- Oil for frying
For the Chaat:
- 1 cup Boiled Chickpeas (Chole)
- 1 cup Boiled Potatoes
- ½ kg Yogurt
- ½ cup Tamarind Pulp
- 1 tbsp Chaat Masala
- 1 tbsp Red Chili Flakes
- 1 tsp Cumin Powder
- ½ tsp Black Salt
- 1 tsp Salt
- 1 small Onion, chopped
- 4 Green Chilies, finely chopped
- 1 small Tomato, chopped
- ½ tsp Tamarind Paste (optional)
For the Green Chutney:
- Green Coriander
- Green Chilies
- Mint Leaves
- ½ cup Yogurt
Instructions
Step 1: Prepare the Green Chutney: Blend together green coriander, green chilies, mint leaves, and ½ cup of yogurt until smooth.
Step 2: Prepare the Tamarind Chutney: Soak tamarind in water, remove the seeds, and boil. Add a pinch of black salt and red chili flakes while boiling. Blend the cooled mixture until smooth.
Step 3: Make the Phulkiyas: Mix besan, all-purpose flour, baking soda, and salt. Add water gradually to form a smooth batter similar to pakora batter. Heat oil in a pan over medium-low heat. Drop small portions of the batter into the hot oil using your hand or a spoon and fry until golden brown and puffed.
Step 4: Soak the Phulkiyas: In a bowl, fill half with water and add ½ tsp of salt. Soak all the fried phulkiyas in this water for 15 minutes. After soaking, gently squeeze out the excess water from the phulkiyas.
Step 5: Prepare the Yogurt: Whisk the yogurt until smooth. Add ½ tsp salt and ½ tsp tamarind paste (optional).
Step 6: Assemble the Chaat: In a bowl, combine the soaked phulkiyas, boiled chickpeas, and boiled potatoes. Sprinkle black salt, cumin powder, chaat masala, red chili flakes, and salt. Pour the whisked yogurt over the mixture. Top with green chutney and tamarind chutney. Garnish with chopped onions, tomatoes, and finely chopped coriander leaves. Serve immediately.
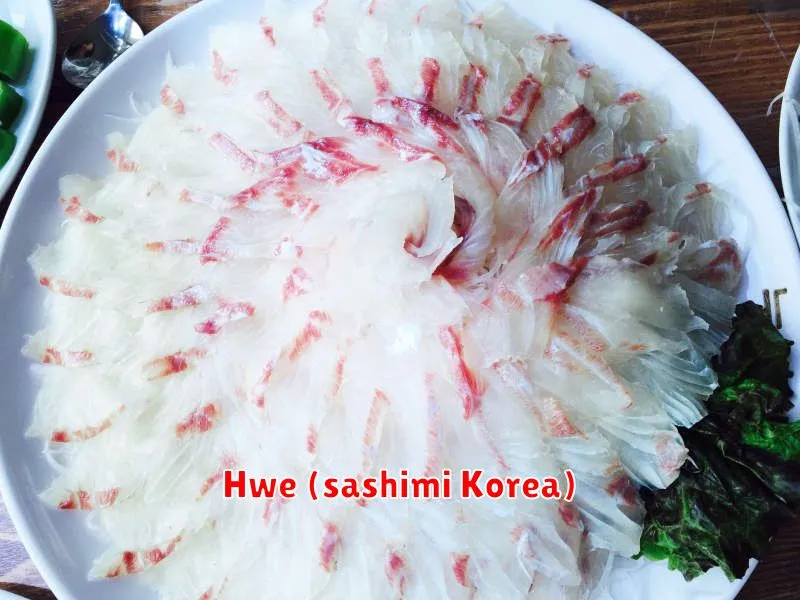
History of Hwe
The enjoyment of raw fish in Korea, known as hwe (or hoe), boasts a rich history, dating back centuries. While the exact origins are debated, evidence suggests that consuming raw seafood existed on the Korean peninsula during the Joseon Dynasty (1392-1910), and likely even earlier. Initially, hwe was more of a preservation method in regions lacking refrigeration, with fish being salted or fermented.
Over time, freshness became paramount. The rise of sophisticated fishing techniques and the availability of ice allowed for the consumption of truly raw fish, closer to the hwe we recognize today. Regional variations developed, influenced by local catches and culinary preferences. Coastal areas naturally featured a more prominent hwe tradition, with specific preparations unique to each region.
The modern era has seen hwe become a staple in Korean cuisine, enjoyed both as an everyday dish and a delicacy for special occasions. From the simplest preparations of sliced raw fish with soy sauce and wasabi to the more complex, marinated versions, hwe’s enduring popularity is a testament to its fresh, clean flavors and its significant place in Korean culinary history.
Nutritional Content and Benefits of Hwe
Hwe, much like other raw fish dishes like sashimi, offers a wealth of nutritional benefits thanks to its fresh, uncooked nature. It’s a high-protein, low-fat food, making it a great choice for those watching their weight or building muscle. The specific nutritional profile varies depending on the type of fish used, but common varieties like salmon, tuna, and sea bream are packed with essential omega-3 fatty acids.
These omega-3s play a crucial role in heart health, reducing the risk of heart disease and stroke. They also support brain function, improve mood, and contribute to healthy skin and eyes. Hwe is also a good source of various vitamins and minerals, including vitamin D, vitamin B12, iodine, and selenium.
Beyond the specific nutrients, the minimal processing involved in preparing hwe means the fish retains its natural flavor and texture. Because it isn’t cooked, there’s no loss of nutrients due to heat, maximizing the health benefits you receive from each bite. This emphasis on freshness also means that hwe delivers a burst of clean, natural flavor that’s often enhanced with simple, complementary ingredients.
Enjoying hwe as part of a balanced diet can contribute to overall well-being. The high protein content helps you feel full and satisfied, potentially aiding in weight management. The abundant micronutrients further contribute to optimal health, supporting vital bodily functions. While the benefits of hwe are numerous, it’s important to source your fish from reputable suppliers to ensure its freshness and quality.
Tips for Choosing Quality Raw Fish
Choosing high-quality raw fish is crucial for both taste and safety, especially when preparing dishes like Korean “Hwe”. Look for fish that appears fresh and vibrant. The flesh should be firm and elastic, springing back when gently pressed. Avoid fish that looks dull, mushy, or has a slimy texture.
Smell is another key indicator of freshness. Fresh fish should have a mild, slightly salty or seaweed-like aroma. A strong fishy or ammonia-like odor is a sign of spoilage. Trust your nose – if something smells off, it probably is.
Pay attention to the eyes. They should be clear, bright, and slightly bulging. Sunken or cloudy eyes are a bad sign. Similarly, the gills should be bright red or pink, not brown or grayish.
Whenever possible, buy your fish from a reputable fishmonger who can answer your questions and provide guidance. Don’t hesitate to ask about the fish’s origin and how long it’s been on display.
For the safest experience consuming raw fish, consider purchasing sushi-grade fish, which is specifically handled and frozen to eliminate parasites. Proper handling and storage at home are also essential. Keep the fish refrigerated at all times and consume it as soon as possible after purchase.